Getting Started
This is an introduction and step-by-step guide for beginning with UVVM, along with examples of common tasks that the designers will have to carry out.
UVVM (Universal VHDL Verification Methodology) is a free and open source methodology for making very structured VHDL-based testbenches. UVVM has been released with two different complexity levels, a low complexity UVVM Light repository with the Utility library and BFMs (Bus Functional Models), without advanced features such as VVCs and command distribution system, and the complete UVVM repository with all features available. The UVVM Light repository is a lightweight version of UVVM that can be used with simple testbenches and as a low-level introduction to UVVM.
Note
UVVM and UVVM Light require VHDL-2008 or newer to compile.
Installation
UVVM can be downloaded as a zip file or cloned using git. We are continuously adding new features to UVVM and the easiest way to receive the updates is by cloning UVVM with git.
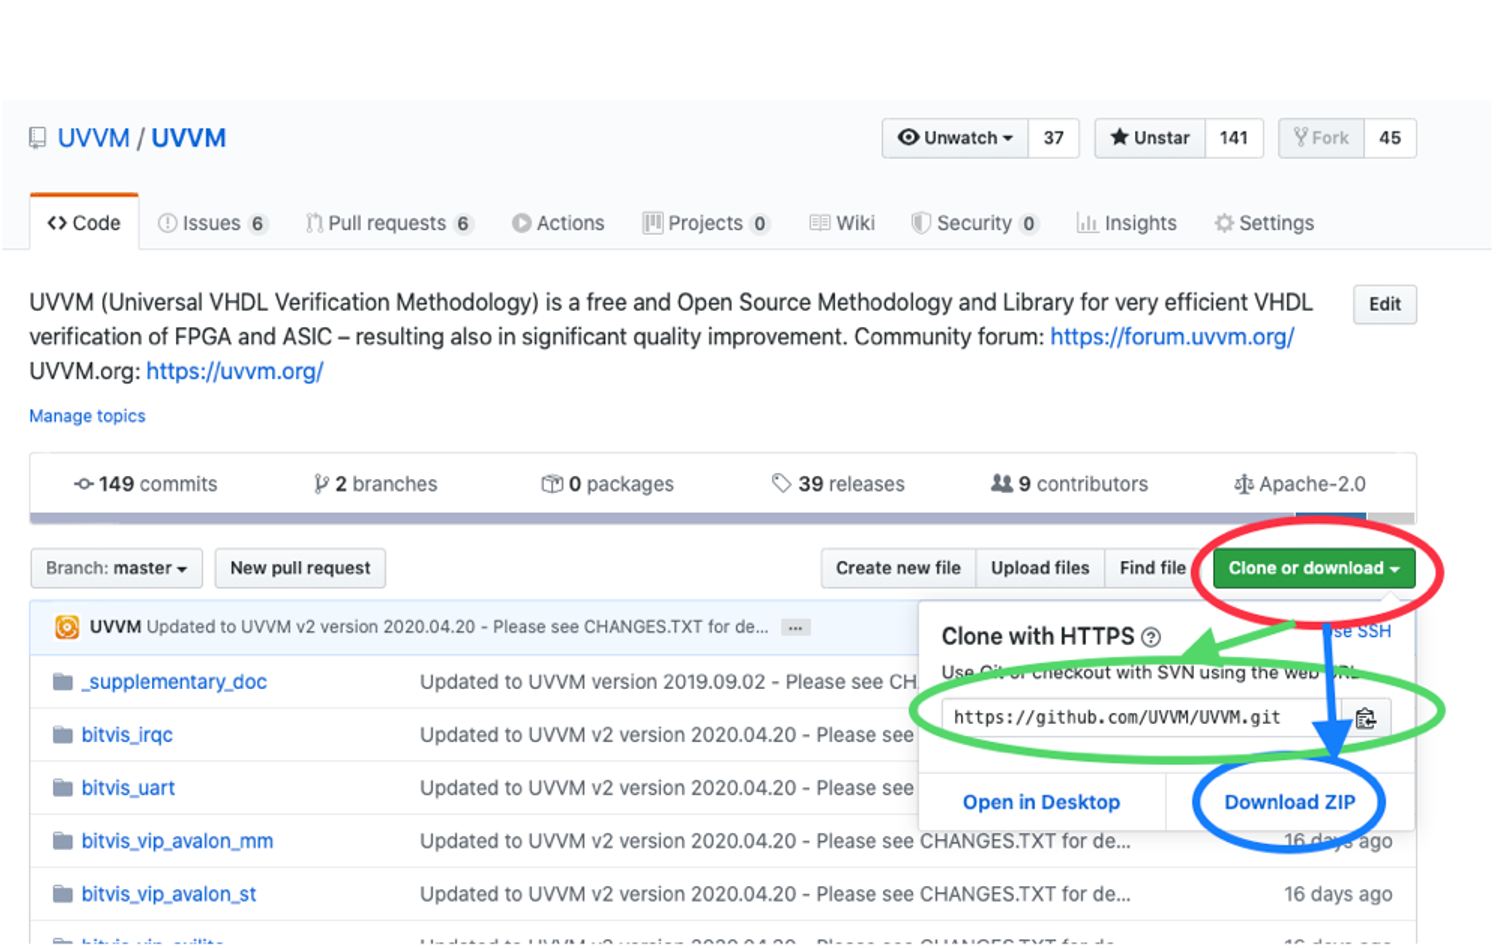
Navigate to the UVVM repository on GitHub: https://github.com/UVVM/UVVM
Select “Clone or download” marked with a red circle:
Clone by copying the repository address (green circle), and from the project folder running the command:
git clone https://github.com/UVVM/UVVM.gitOr download everything as a zip (blue circle) and extract the downloaded file in the project folder.
After cloning or unzipping UVVM you have all that is needed to start using UVVM and all of its features with your testbench.
Updating UVVM
The method for updating UVVM depends on the chosen installation method:
Cloned using git: run the following command in terminal inside the UVVM folder to receive the latest release changes:
git pullDownloaded as a zip: repeat step 2b and replace the old UVVM version with the new downloaded version. Note that this will overwrite any local changes to UVVM, e.g. local changes in the adaptations_pkg.vhd
Testbench
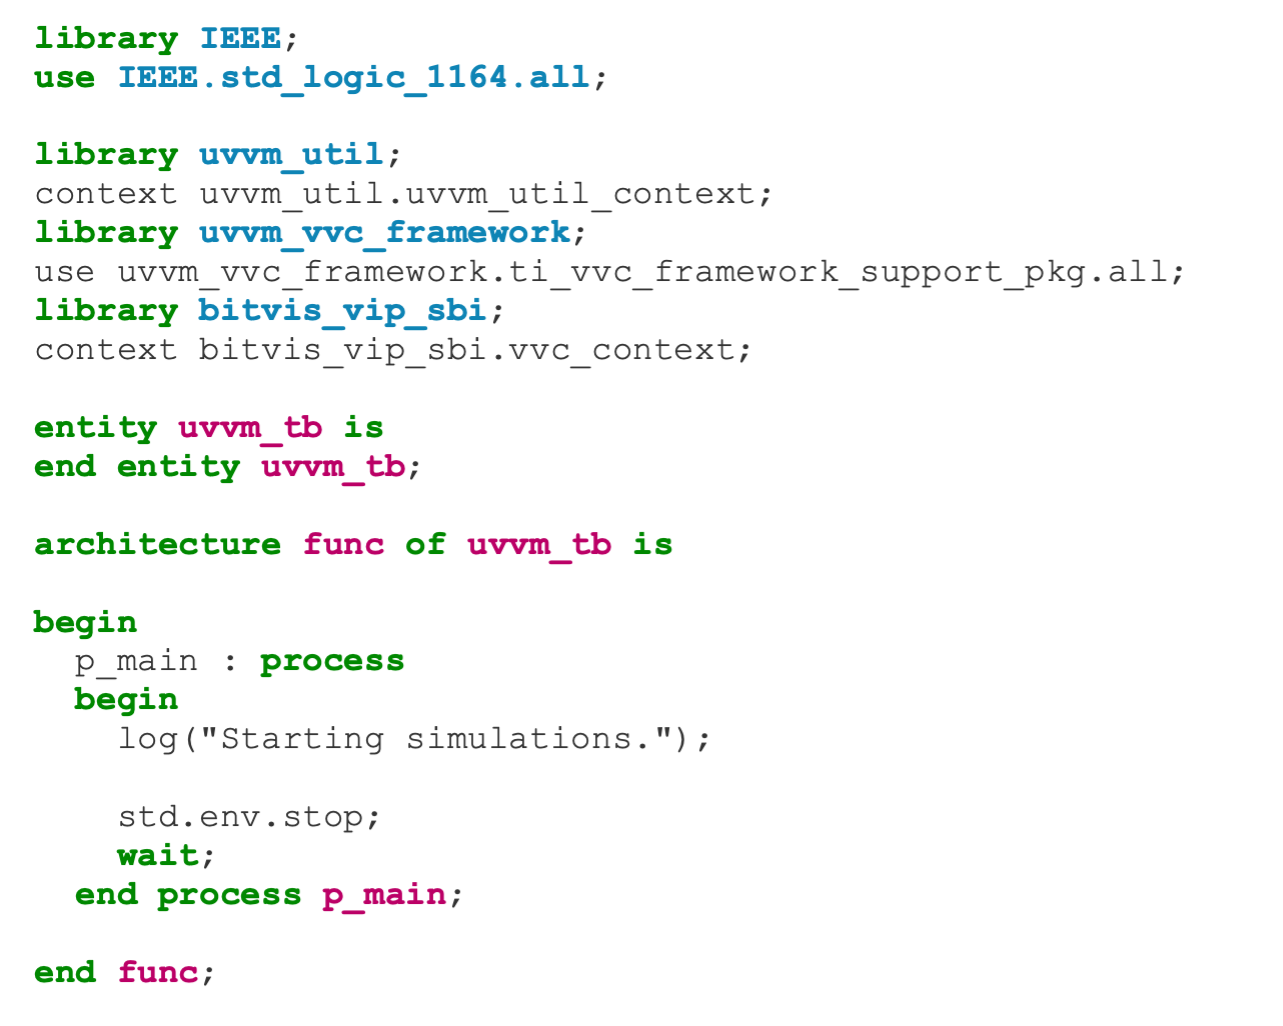
Include uvvm_util_context and the VVCs or BFMs you will be using in your testbench to start using UVVM:
library uvvm_util;
context uvvm_util.uvvm_util_context;
library uvvm_vvc_framework;
use uvvm_vvc_framework.ti_vvc_framework_support_pkg.all;
library bitvis_vip_sbi;
context bitvis_vip_sbi.vvc_context;
The context files will ensure that everything necessary are made available from within the testbench, e.g.
Compilation
UVVM can be compiled by calling the UVVM/script/compile_all.do file using simulator GUI or from the command line, this will
compile all of UVVM. Each of the modules/VIPs in UVVM also have their own compilation scripts in a /script folder, e.g. for
the SBI VIP bitvis_vip_sbi/script/compile_src.do. The compile_src.do script can take two arguments, where the first argument
is the module/VIP installation path and the second is the target path of the compilation, i.e.
compile_src.do <source_path> <target_path>.
The following example of compiling UVVM from the command line and with Modelsim GUI have the following directory structure:
/UVVM
  ...
  /bitvis_vip_sbi
  /uvvm_util
  /uvvm_vvc_framework

/my_project
  /sim
  /my_src
  ...
and the vsim command / Modelsim GUI is run from the /my_project folder with the /sim folder as compilation target:
Command line example for UVVM Utility Library compilation:
$ vsim -c -do "do ../UVVM/uvvm_util/script/compile_src.do ../UVVM/uvvm_util ./sim"Modelsim GUI example:
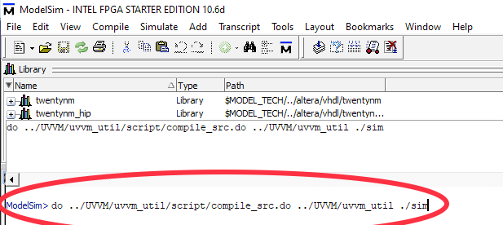
Note
../UVVM/uvvm_util/script/compile_src.dois the relative path to thecompile_src.doscript for the UVVM Utility Library.../UVVM/uvvm_utilis the relative path to UVVM installation (source path), for../UVVM/script/compile_all.do, use../UVVM/scriptas source path../simis the relative path to the compilation target (target path).
Another way of compiling all UVVM libraries and VIPs is using the UVVM/script/compile_all.sh shell script:
sh compile_all.sh <simulator> <target_dir>
Note
<simulator> specifies the simulator to be used and should be ghdl, nvc, vsim or ‘xsim’. Note that current UVVM support in Xsim is limited.
<target_dir> sets target directory (defaults to current directory if not specified).
Compilation Order
Most of the modules/VIPs have some dependencies, thus compilation has to be performed in a specific order. The compilation order
of the source files for a module/VIP is listed in the script/compile_order.txt file and in the quick reference PDF in the
/doc folder. The library dependencies, i.e. other modules/VIPs that needs to be compiled prior to compiling a particular
module/VIP, is listed in the quick reference PDF of each module/VIP.
As a rule of thumb, every module/VIP have the following dependencies:
UVVM Utility Library
UVVM VVC Framework
Bitvis VIP Scoreboard (most of the VVCs have built in scoreboard functionality)
Demo testbenches
Demo testbenches are provided in the bitvis_irqc and bitvis_uart directories.
To compile and simulate a demo, start by navigating to its script sub-directory. Users of ModelSim, Questa, Riviera Pro and
ActiveHDl can run the compile_all_and_simulate.do script:
vsim -c -do compile_all_and_simulate.do
Alternatively, run the compile_all_and_simulate.sh shell script:
sh compile_all_and_simulate.sh <simulator> <target_dir>
Note
<simulator> specifies the simulator to be used and should be ghdl, nvc, vsim or ‘xsim’. Note that current UVVM support in Xsim is limited.
<target_dir> sets target directory (defaults to current directory if not specified).
Running Shell Scripts on Windows
[MSYS2](https://www.msys2.org/) is recommended for running shell scripts, GNU utilities etc on Windows. It is also recommended for the GHDL and NVC simulators. Remember to add the MSYS2 binary directories to the Windows path if you would like to use a Windows Terminal or Command Prompt instead of the MSYS2 terminal:
C:\msys64\usr\bin
C:\msys64\mingw64\bin
C:\msys64\mingw32\bin
GNU Make Support
Experimental support for using GNU Make to drive simulation of the bitvis_uart and bitvis_irqc examples is now included.
The script sub-directory of these examples now includes a Makefile which can be used to compile, simulate and view the
resulting waveform in GTKWave. The supported simulators are GHDL, NVC, ModelSim and Questa.
To try it out, open a terminal, navigate to the script sub-directory of the relevant example, then run make, specifying
the simulator as the target. For example, on Windows/MSYS2, in a Windows Command Prompt:
cd C:\work\UVVM\bitvis_uart\script
make ghdl
Replace C:\work\UVVM with the correct path to your clone of the UVVM repository.
The heavy lifting is done by a couple of Makefile includes (multisim.mk and example.mk) and a shell script (vcd2gtkw.sh)
which are located in the main script directory, along with Makefile_template which can be used as a starting point for
using Makefiles in your own projects.
On Windows, MSYS2 is recommended. Use
pacmanto installmake(required) andgit(recommended).At present, precompiled UVVM libraries are required. See the simulator specific notes below for details.
Simulator Specific Notes
GHDL
To precompile the UVVM libraries and VIPs, run the compile-uvvm.sh script which is located in the vendors sub-directory of
the GHDL libraries directory. On Linux, the default location of this directory is /usr/local/lib/ghdl. On Windows/MSYS2, the
default location is C:\msys64\mingw64\lib\ghdl.
NVC
UVVM support in NVC is partially complete, but sufficient for the examples.
To precompile the UVVM libraries and VIPs, run the following command:
nvc --install uvvm
ModelSim/Questa
The compile_all.do script located in the main script directory can be used to precompile the UVVM libraries and VIPs. Choose
(or create) an appropriate directory for user precompiled libraries, and create a uvvm sub-directory under it. This sub-directory
is the 2nd argument to the script. For example, on Windows/MSYS2, enter the following command in a Windows Command Prompt:
vsim -c -do "do C:/work/UVVM/script/compile_all.do C:/work/UVVM/script C:/work/.simlib/uvvm; exit"
Replace
C:/work/UVVMwith the correct path to your clone of the UVVM repository.Replace
C:/work/.simlibwith the correct path to your precompiled libraries directory.Note the forward slashes!
The multisim.mk Makefile include assumes that precompiled libraries are located in the .simlib sub-directory of the
home directory. You can change this by setting the SIM_LIB_PATH variable in your Makefile.
Questa One Extended Features
Questa One v.2026.1 and newer supports some extended features for UVVM Functional Coverage and Enhanced Randomization. Note that these features are exclusive to Questa One, and will not work with other simulators.
When running Questa One, follow these steps to enable the extended features:
In the
uvvm_util/srcdirectory, replace the files nameddummy_<package_name>with the corresponding packages namedquesta_<package_name>found in themisc/vendor_extensions/questadirectory.If using the UVVM compile scripts found in the
uvvm_util/scriptdirectory, open the fileuvvm_util/script/compile_order.txtand change the names of the files replaced in step 1 fromdummy_<package_name>toquesta_<package_name>.When running simulations, use the
qoptandqsimcommands for optimalization and simulation. Theqoptcommand must be run with argumentqoneRandLib.RandLibfor the Enhanced Randomization extensions to work and with the-access=r+/.switch for the Functional Coverage auto-sampling feature to work.
Example of qopt/qsim commands:
vcom -2008 <vhdl files>
qopt -o opt <my_tb_entity> qoneRandLib.RandLib  -noincr -access=r+/.
qsim -c opt -do "run -all"
qopt argument |
When is it required? |
|
|---|---|---|
qoneRandLib.Randlib |
Required for Questa One Enhanced Randomization extensions to work. |
|
-access=r+/. |
Required for Questa One Functional Coverage auto-sampling feature to work. |
|
-noincr |
Optional. Forces full re-run of design optimization, which may be needed
if the design was previously optimized without the |
|
For more information about extended features for Functional Coverage, see Questa One extended Functional Coverage functionality
For more information about extended features for Enhanced Randomization, see Questa One extended Randomization functionality
Further Reading
We recommend that everyone new to UVVM have a look at the
Simple_TB_step_by_step and
UVVM_Utility_Library_Concepts_and_Usage
power point presentations located in the UVVM/uvvm_util/doc folder. There are several other documents to explore and we
recommend that you start reading those located in the UVVM/uvvm_vvc_framework/doc folder when you feel ready to advance with
the many features of UVVM.
We encourage the UVVM community to participate in the UVVM user forum with questions and discussions at https://forum.uvvm.org, and to visit the UVVM news site at https://uvvm.org.